6 Simple Ideas For Adding the Finishing Touch to Your Home

So you look around your home and you’re fairly proud of it. You’ve invested in quality furnishings; that English arm sofa and wing back chairs cost a pretty penny but you know they’ll be around for years to come. You selected paint colors and finishes that really compliment the space; that navy blue/gray/kelly green color palette is classic and truly represents you. But something is still missing. You can’t quite put your finger on it. So what gives?

To the trained eye, the answer is pretty obvious. But for many homeowners it remains a mystery. That missing link or missing “piece” are the finishing touches. What do I mean by this? Hear me out for a bit.

Finishing touches are those elements that are added to a space to make it feel….finished. They are the details that let you know what the energy of the home is, and how you should feel when you step inside. To put it simply, it gives personality to a space.

Below are 6 simple ideas for adding the finishing touch to your home decor to eliminate that empty feeling.

Finishing Touch Idea #1- Area Rug

A rug brings warmth to a room. A good wool rug feels so nice and cozy underneath your feet; especially if you have hardwood floors. Rugs can also add depth; your eye will naturally follow the color or pattern to the end. It’s important to choose a rug material that fits in with your lifestyle and correlates to the amount of foot traffic in the room.

A rug with the right color palette will also help to tie all the elements in a room together. Just be sure to pick the correct size for your space because too short rugs are a real downer. Read my rug size guide post here to help you out.

Finishing Touch Idea #2- Window Treatments

Window treatments play such a big role in a room. Drapes add drama and sophistication; roman shades and blinds are great at providing function and comfort. Regardless of whether your goal is privacy, light filtration, or just for looks; window treatments are one of those accessories that finishes a space. You know that perfect set of pearls you like to wear with that little black dress? Yeah; window treatments are the pearls in your space.

Finishing Touch Idea #3- Art

Walls are similar to window treatments. Blank walls make a room feel cold and empty. Art helps to add personality and character to your home. However; art is such a personal thing and I do recommend that you take your time and invest in pieces that speak to “you”.

Finishing Touch Idea #4- Lighting

Lighting helps to set the mood in a space. If your home lacks adequate lighting, the room will lack the right amount of warmth and ambiance. There are generally 3 basic types of lighting that are used in each space of your home.

Ambient lighting is general lighting. Its the harsh, bright lighting such as canned lights and chandeliers in a room. Task lighting is lighting used for a particular task. For example, a table lamp on your nightstand to help with nightly reading. Finally, accent lighting is used to create a focal point for something. Like wall sconces next to your favorite wall art display.

An optimal amount of lighting in a room would include ambient, task and accent lighting. However; its fine if you have 2 out of 3.

Finishing Touch Idea #5- Accent Pillows

Tiny pillows or a lack of accent pillows add no value to that lovely English arm sofa I mentioned earlier. Have some fun and incorporate pillows in a color found in your area rug. When choosing pillows, try the no-fail combination of one 20-inch by 20-inch, one 16-inch by 16-inch, and one 12-inch by 16-inch.

Finishing Touch Idea #6- decor Accessories

Last but definitely not least are decor accessories. These are your filler items like books, flowers, knick knacks, etc. Accessories are truly the icing on the cake.

Don’t fill up an empty bookcase just for the sake of; be strategic on what you pick since they’ll be on display in your home. Try to pick things that vary in texture, size and color. No matchy-matchy please.

These finishing touches, when incorporated correctly, will help your home look stylish and feel complete! You’ll then be able to impress your friends and provide suggestions to them on what’s needed to finish the look in their homes. Only tell them if they ask first!!

10 Simple Ways to Make a Small Space Appear Bigger

When dealing with a small space, it’s important more than ever to capitalize on using only the things that you need and love most. With a limited amount of square footage, you really have to plan how you will use the space BEFORE you decorate. This will in turn push your creative limits but you’ve got this!

Below are 10 simple ways to make a small space appear bigger. Now go forth and do your thing.

  1. Use a neutral Color Palette

Light or neutral color palettes visually makes your space expand. This concept is ideal for your walls, trim and mainstay pieces like a sofa and chairs. I simply could not live in a space filled with whites, beige, and tans. So if you’re a color enthusiast as well; you can incorporate pops of non-neutrals through accent pillows and decor accessories.

2. Give the Illusion of High Ceilings

If your small space also has low ceilings and you want to hang drapes, use the “high and wide method”. This basically means that you would mount the rod and hang drapes close to the ceiling to create the illusion of height.

To create the illusion of a wider window, extend the rod up to 12 inches beyond the window’s frame. This will ensure that when drapes are open, they don’t cover the window frame and allow light to come in.

3. Use Mirrors

Mirrors serve a dual purpose. They are great at visually expanding a space and adding light. They can also be used to reflect artwork or other interesting things on the opposite wall. Just make sure that whatever the mirror is reflecting is something that you want to see.

4. Choose Multi-Functional Furniture

Select furnishings that are stylish and serve a double duty. For example, ottomans can be used as both a coffee table and extra seating. Or a daybed can serve as a sofa during the day and bed at night, especially if you don’t have space for a guest room.

5. Choose Furniture That Doesn’t Weigh the Space Down

A glass top coffee table, a Lucite dining table or acrylic chairs are great examples of furniture that would visually expand a space and make it feel less cramped.

6. Maximize Natural light

Use sheer drapes to allow natural light to shine through. Or leave your windows uncovered if privacy isn’t an issue. This will create a sense of depth in a small space.

7. Don’t Place Your Furniture Against the Walls

Not placing furniture against the walls makes it appear to “float’ in the room and eliminates that awkward dead space in the middle.

8. One Focal Point

A small space only needs one focal point. If you have a built-in focal point such a fireplace or bay windows, be sure to minimize other items in the room so they don’t compete with it.

If your space lacks a focal point, a gallery wall is a great option that won’t take up too much space. Instead of using many small art pieces grouped together, use fewer pieces with wider mats. The effect will be the same but the space will feel less crowded.

9.Choose Furniture with Exposed Legs

Skirted sofas and chairs appear boxy in a small space. Opt for sofas and armchairs that are raised on legs, which creates a sense of light and space.

10. Remove Clutter

“A place for everything and everything in it’s place” is so important in a small space! Be sure to store everyday items like remote controls in storage baskets or boxes. And don’t allow magazines or books to lie around on tables.

The struggle is real when it comes to living in a small space. But its doable if you are strategic in designing your space in a way that feels less cramped and makes it appear bigger.

Have you used any of these ideas to make your small space appear bigger?

Stay Stylish, (2).png

Sofa Series Part II: 5 Tips to Consider When Buying a Sofa

decor_by_demi_6_tips_for_buying_a_sofa.jpg

Welcome to Sofa Series Part II! If you’re playing catch up, you’ll want to click here to check out Part I first.

So now that you’re all caught up and know the different sofa styles, it’s time to go shopping. Below are 5 key tips to consider when buying a sofa.

Sofa Tip #1: Choose Your Style

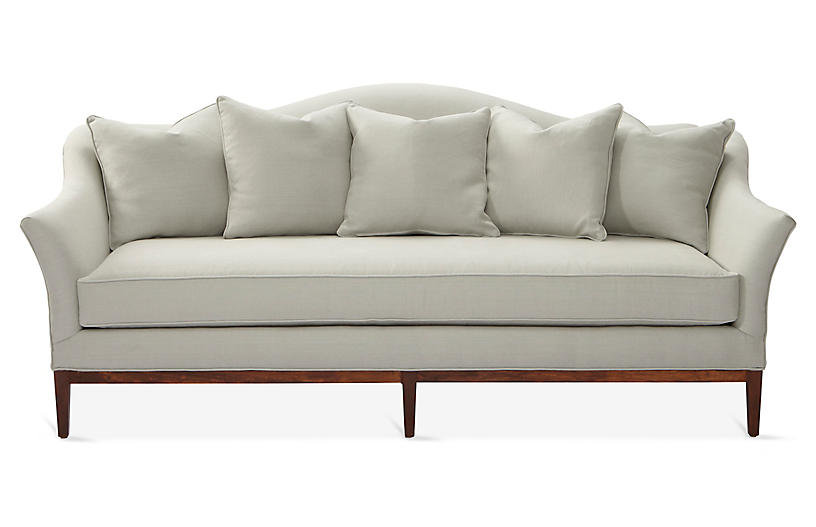
There are so many things to consider when choosing your favorite style. There are pros and cons to each and depending on your needs; you’ll want to choose one that fits perfectly with your lifestyle. For example, if your goal is comfort and to find a sofa great for napping; you may want to pass on the Tuxedo or Camelback due to its awkwardly high and narrow arms.

Sofa Tip #2: Measure Your Space

This rule should be obvious but many people overlook it. So many returns have taken place because folks forget to measure and then bring home furnishings that are too big or too small for a space. First, measure your interior space. If you already have a sofa in the room that’s an ideal size; write down those measurements and take them with you when shopping. A measuring tape will also come in handy while shopping so make sure to bring one to measure your new sofa.

Sofa Tip #3: Check the Construction

It’s all about the inner workings of the sofa. This is the frame, joints, and springs. All these things combined will determine the durability and longevity of the sofa.

Frame

You’ll want to make sure your frame is a kiln-dried hardwood. And…plywood isn’t one of them. Some popular and reliable ones are oak, poplar, and maple due to them being less resistant to cracking over time. The goal here is to ensure your frame remains intact and durable over the long haul.

Joints

The old school way of building a sofa used mortise and tenon joinery. The current trend is to now use staples and glue to hold them together. This results in a sofa that is built to last for a few years top, as opposed to a quality sofa that can be handed down for generations to come (think Granny’s furniture she kept in the formal living room).

So no one really goes around knowing this stuff off the top of their heads. Therefore, always ask a sales person to provide the specifications when shopping. If they don’t know or can’t provide, its probably best to move on.

Springs

This is hard to test because so many companies tout themselves on using some form of a 8 way hand tied system; which is the gold standard. One way though is to lift the cushions of the sofa and press down on the seat. You should be able to feel the springs; they should be close together and evenly spaced. And they absolutely should be springy.

Sofa Tip #4: Choose Your Fabric

The choice of fabric will depend on your lifestyle. There are a plethora of materials to choose from however; I will caution that families who have children and pets should definitely look into a performance fabric or genuine leather. Both are kid-proof, stain resistant, and do well with pet hair. Just be sure to keep Fido’s nails groomed.

Sofa Tip #5: Test Drive the Sofa

Once you’ve figured out all of the above, it’s time to give your new found love a spin. This is not the time to play coy either. The tests below will help you determine if you’re a match made in heaven.

You’ll want to sit for a while and see how the sofa performs. How do the cushions feel on your tush? Are they too firm? Or do you feel like you sink into the sofa? Recline in a variety of positions and see if you feel comfortable.

Bounce on the sofa a bit to check the suspension. Does it squeak? Does it feel springy enough? The suspension directly relates to the coil system and how much pressure/weight your sofa is equipped to handle.

Last but certainly not least, grab an arm and try to wiggle it from side to side. A well built frame should not wiggle. Also take a look at the stitching or patterns; they should line up properly and be centered.

I hope this series has been helpful and allows you to become a well informed buyer on your next sofa expedition.

If this has been information overload and you need help along the way, my Decorator By Your Side services are the perfect solution to providing expert advise on an as needed basis. Go forth and shop!!

Stay Stylish, (2).png

Sofa Series Part I: 8 Main Sofa Styles

decor_by_demi_sofa_styles_chesterfield_sofa.jpg

So recently, I’ve been thinking about buying new furniture for our family room. Well this idea has opened up a whole can of anxiety on what to buy, how much to spend, should I just re-upholster instead, etc. If I look at one more sofa online, I’m going to put myself in time out. I’ve spent countless hours obsessing over this and figured perhaps there were millions of other people facing the same situation.

As a result, I decided to put together a 3 part sofa series to help educate clients on all things related to the sofa. Many times I find that people aren’t familiar with sofa design styles. This will help save a lot of time and narrow down your search when shopping for sofa styles. However; to do this you first need to know the names of the styles, right? So today we begin with The Sofa Series Part I: 8 Main Sofa Styles.

Sofa Style: Chesterfield

Key features: The Chesterfield features rolled arms the same height as its back along with beautiful tufting. Nail head trim is usually featured along with either caster or tulip bun style legs. This sofa screams bravado and swagger!

The Chesterfield is a tight back style sofa; meaning there are no loose back cushions. This sofa is sure to be a showstopper in any room it resides. This is my favorite sofa style!!

Sofa Style: CamelBack

Key Features: The CamelBack’s names derives from the arch across the back that resembles a camel’s hump. This curvaceous sofa showcases a subtle curved arm and looks right at home in a more formal style setting. The Camelback is also a tight back style sofa.

Sofa Style: English Roll Arm

Key Features: Just as the name implies; this sofa style features short, rolled, and padded arms. The legs are either caster or tulip bun style. Featuring plush seat and back cushions, this sofa has a relaxed vibe and will fit in any decor style.

Sofa Style: Tuxedo

Key Features: A relative of the Chesterfield, the Tuxedo also features arms the same height as its back as well as gorgeous tufting. Also, the Tuxedo falls in the tight back category. However, the silhouette of this sofa style is more modern and sleek; including it’s feet design.

Sofa Style: Settee

Key Features: The Settee is a curvaceous and sophisticated sofa. It reminds me of high tea and fancy events. Because of its size, this petite sofa would do well in a small space. The silhouette and narrow legs also helps to reiterate the human scale size of this sofa.

Sofa Style: Cabriole

Key Features: A continuous back curve that extends down into the arms is a prominent feature of the Cabriole. The legs are generally wooden and also feature an “S” curve although this particular style is more modern with it’s metal legs.

Interestingly the word cabriole derives from the French word, “cabrioler” which means to jump like a goat.

Sofa Style: Lawson

Key Features: The Lawson is all about an informal and comfortable lifestyle. The big fluffy cushions and rolled arms are ideal for napping or reading a book. The furniture legs are modern in style but the overall silhouette is traditional in nature.

Sofa Style: Mid-Century

Key Features: The Mid Century style sofa represents, simplicity, clean lines and minimalism. The modern metal frame is also a break away from the traditional look of wooden legs. However, the tufting is a nod to classic design. The Mid Century is very Mad Men.

Each sofa style is gorgeous and unique in its own way. You really need to figure out how long you plan to keep the sofa and your how much “love” the sofa will receive based on your lifestyle. Which is a great segue into The Sofa Series Part II: 5 Tips to Consider When Buying a Sofa”.

But first…

Which sofa style is your favorite? Answer below in the comments.

Stay Stylish, (2).png

Design 101: 4 Ways to Add Style to a Bookcase Back Panel

Styled by Decor By Demi

Styled by Decor By Demi

Most of the time a bookcase back panel goes neglected. The decor items on display usually get all the attention however, back panels need love too!

Decorating the back panel is a great way to add color, style and interest to an otherwise boring bookcase. It’s also a cost effective way to give this case good a new look.

Below I’ll highlight 4 simple ways to add style to your bookcase back panel and make it really stand out among the competition!!

Ways to Add Style to a Bookcase Back Panel #1: Wallpaper

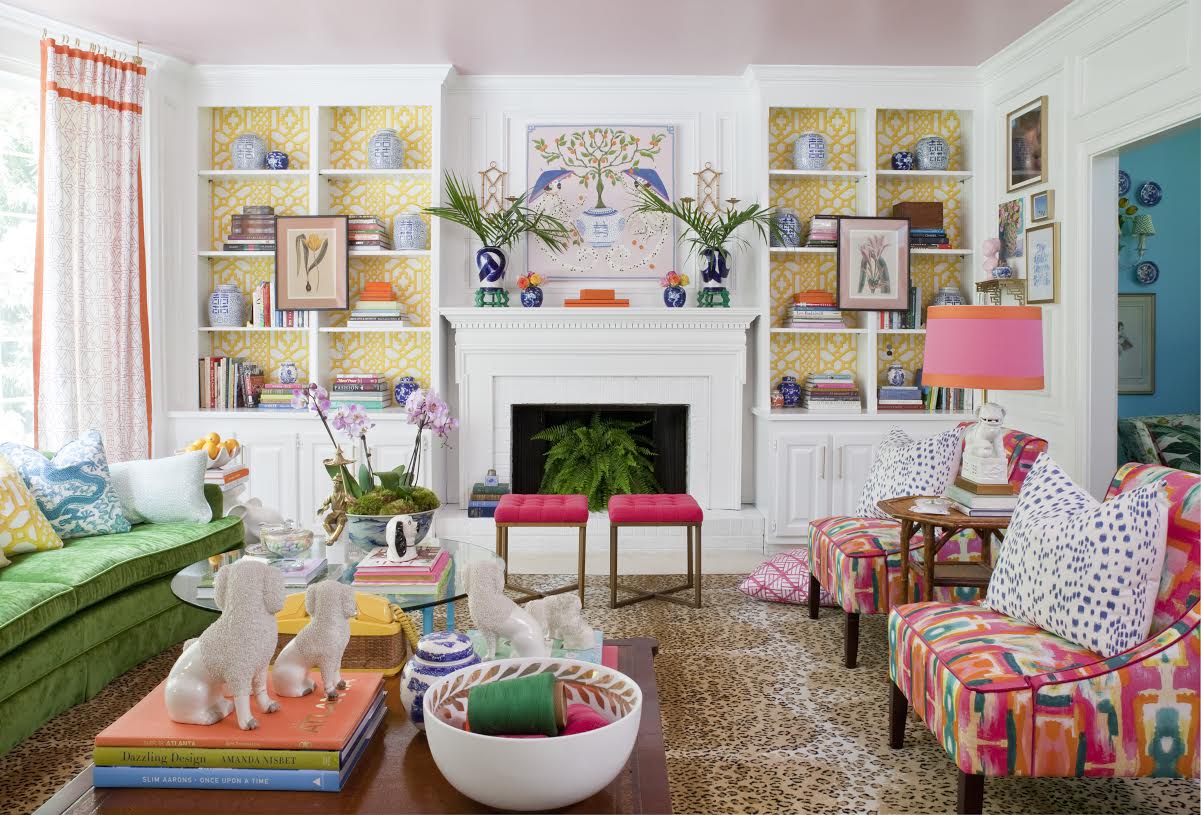
First off this entire room is gorgeous and gives me goose bumps! The beautiful chaos of colors and patterns make my little maximalist heart sing!!

Back to the bookcase…the decor accessories would do a lovely job by themselves. However, the wallpaper totally ups the ante on style. There are a plethora of styles to choose from and wallpaper is a great DIY option since its pretty cost effective to install.

Ways to Add Style to Your Bookcase Back Panel #2: Paint

Another great option is paint. Paint is truly the most cost-effective way to give anything an updated look. Painting the back panel of a bookcase is a great way to bring in an contrasting color and really make the decor accessories pop! This is especially true with white bookcases.

Ways to Add Style to a Bookcase Back Panel #3: Beadboard

If your goal is to add a bit of rustic charm to your room, adding beadboard or ship lap is the way to go.

Ways to Add Style to Your Bookcase Back Panel #4: Mix & Match

Lastly, if you’re feeling bold and adventurous, you could mix and match using the suggestions from above. For example, if your bookcase has a lot of compartments, you could paint each back panel a different color to bring in some fun. Or you could do a combination of paint and wallpaper.

So now you have options on what to do with your bookcase back panels. The level of creativity and fun you bring to them is totally up to you!

Have you tried one of these suggestions with your bookcase back panel? If so, let me hear about it in the comments.

decor_by_demi.png

Designer Picks: My Top 4 Flush Mount Lights for My Small Entryway

My Entryway

My Entryway

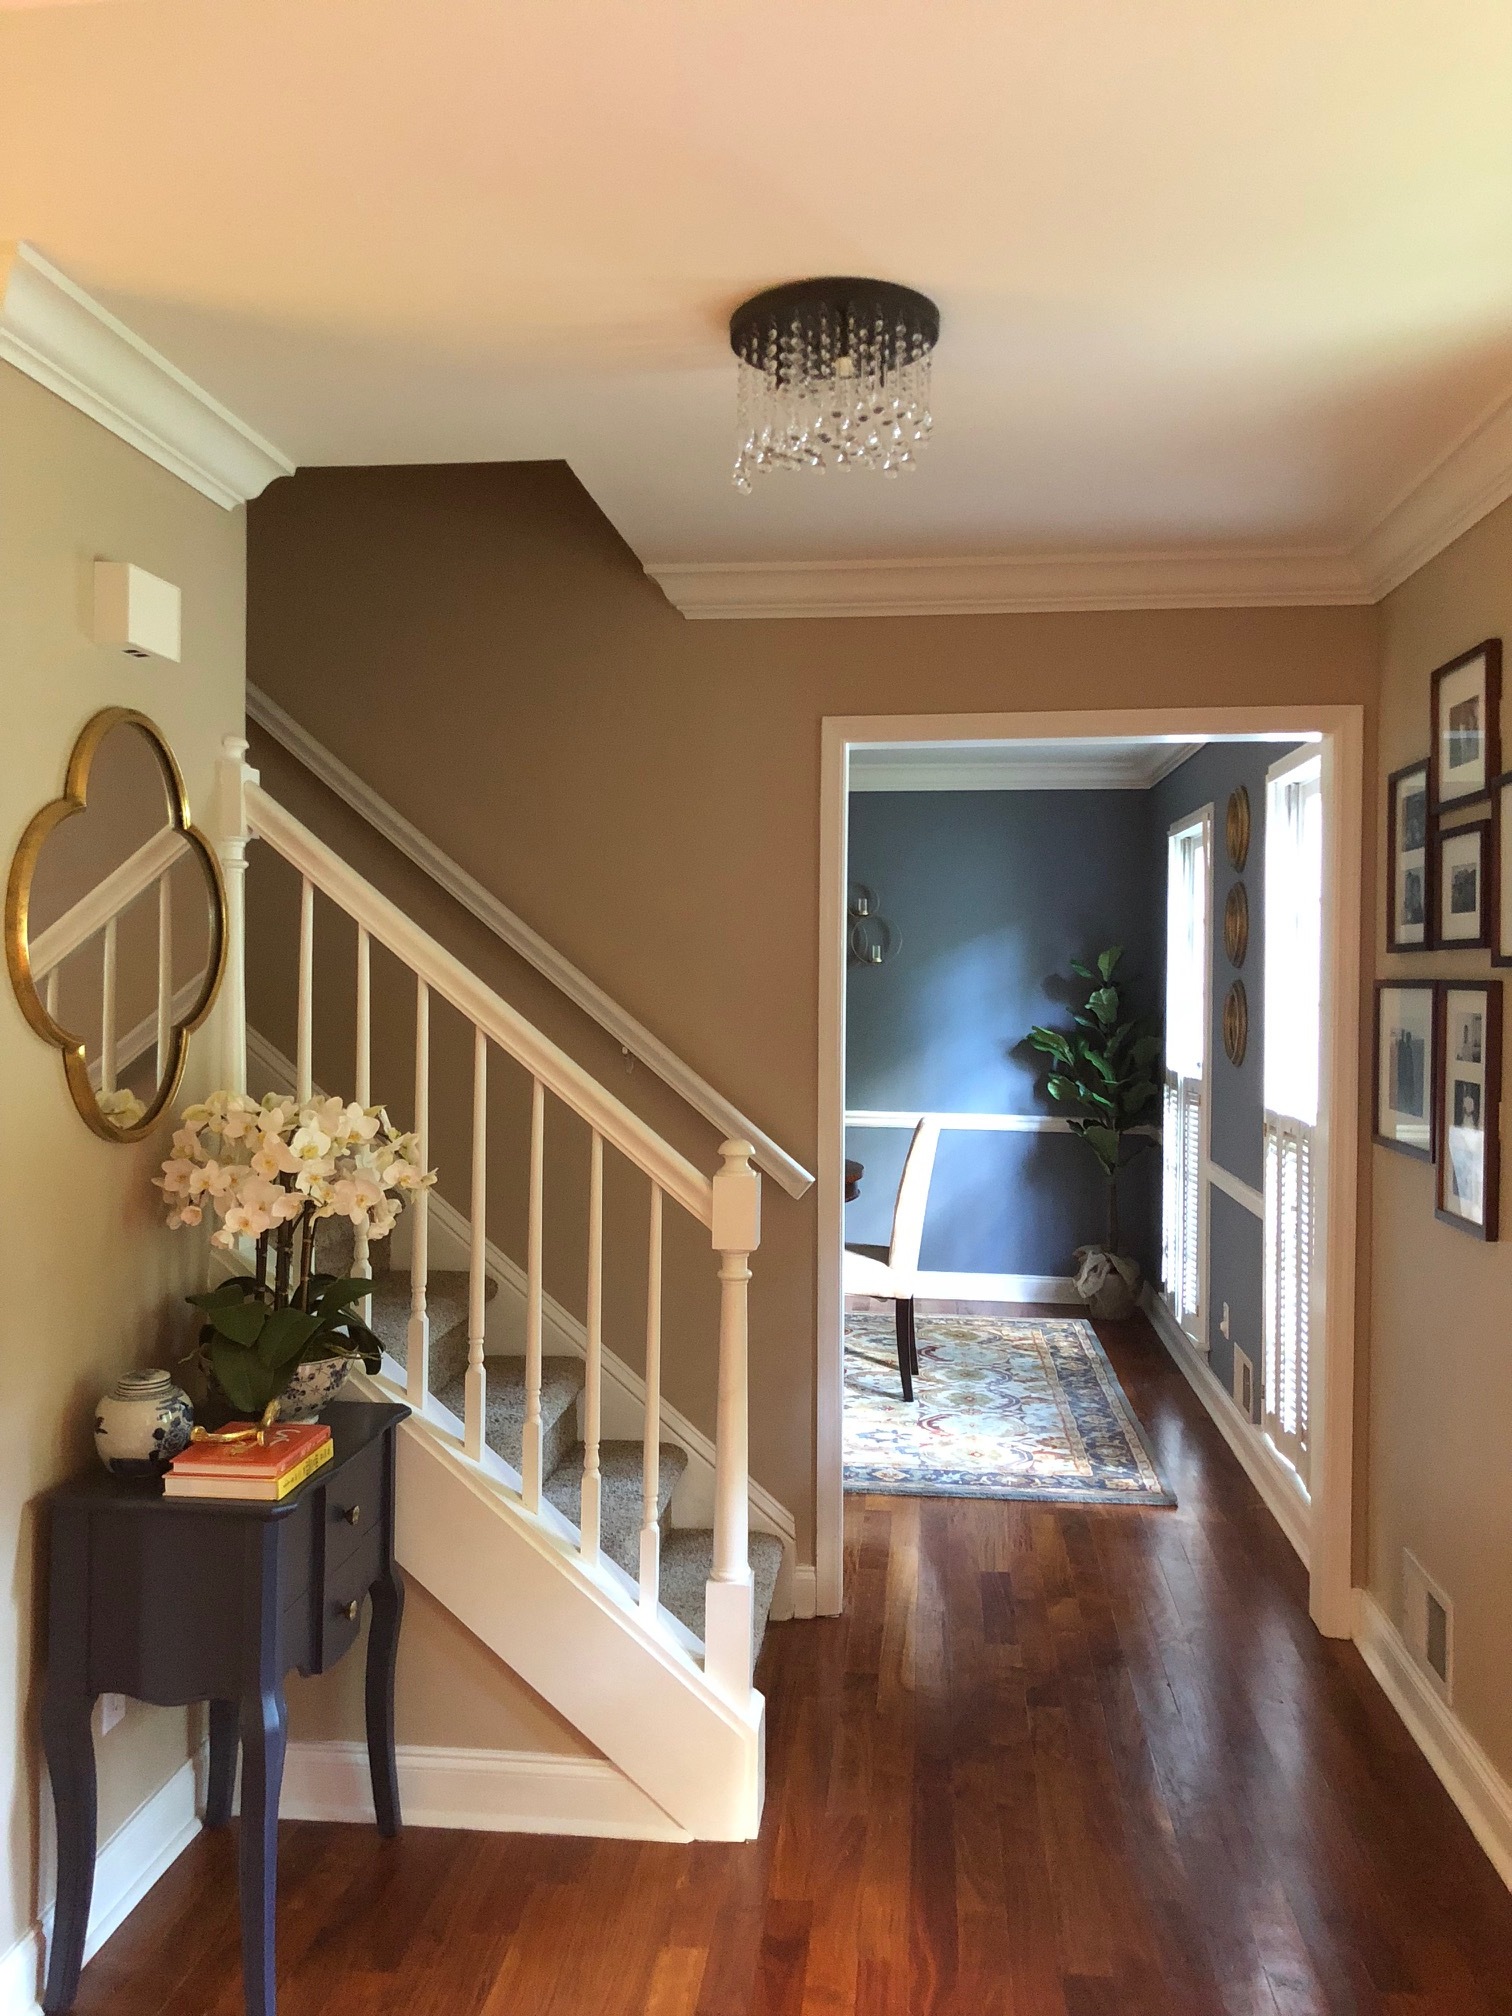
My current obsession at the moment is flush mount lighting. I have spent countless hours looking for "the one" to put in my entryway. The one currently occupying the space (in picture above) is just not doing it for me. 

My requirements are pretty simple. The first one is the fixture needs to give off ambient lighting. I really hate walking into a foyer and it feels dark and neglected. The second is it needs to be brass. I want to select a fixture that ties in with the brass mirror and the decor accessories. We already have enough "50 Shades of Brown" happening with the walls, picture frames and hardwoods. Lastly, I'd prefer a semi-flush mount to add a little hang time. My ceilings are 8 ft tall so nothing too big and too low. I"m totally open to a flush mount as well; it all depends on what I fall in love with.

So I've finally narrowed it down to my top 4 choices and decided to share them with you. Hopefully, your comments and suggestions will help me choose a lucky winner.

Option #1: Flush Mount for Small Entryway

decor-by-demi-entryway-lighting-ideas.jpg

First up is this gorgeous light fixture from Lights.com. This actually is my favorite one! I love the scalloped details; it ties in nicely with my quatrefoil mirror. The drum shade is made of a white linen fabric material which is a nice change from glass. The design is clean and a bit modern. However, this flush mount would complement a transitional space. Lighting is sufficient; it holds 2 100W incandescent bulbs. Love, love it!

Option #2: Flush Mount for Small Entryway

decor-by-demi-entryway-lighting-ideas (2).jpg

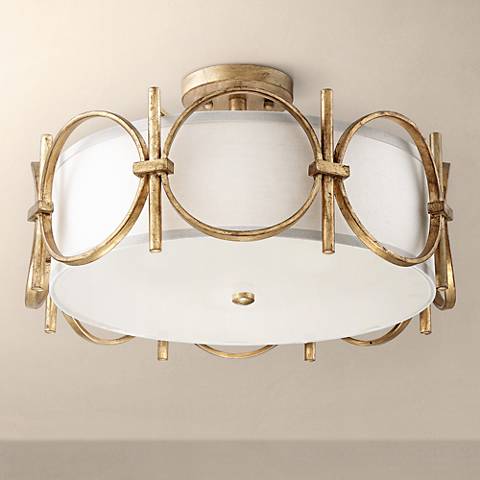
The brass details on this are so pretty! This beauty is from Lamps Plus. The brass has an aged finish to it and I love the geometric framework. This style could work well in a traditional or transitional home. This fixture uses 3 max 60 watt bulbs and...its semi-flush!

Option #3: Flush Mount for Small Entryway

decor-by-demi-entryway-lighting-ideas (3).jpg

Another semi-flush mount for the win! So this fixture is pretty but it reads "super traditional" for me. I'm also not in love with the frosted glass. Although this fixture uses a maximum of 3 100 watt bulbs, I'm worried about the light being blocked from the glass and metal surround. This one is probably my least favorite. You can find other details on this Minka Lavery light here.

Option #4: Flush Mount for Small Entryway

decor-by-demi-entryway-lighting-ideas4.jpg

Is it obvious I have a thing for drum shades?

Last but definitely not least is this lovely fixture from Rejuvenation. It's also semi-flush and pretty amazing. Love the brass line details and feel that this would be a great statement piece. However, I'm not sure if the style fits in well with my aesthetic. This seems better suited in a modern style home, don't you think? This lovely light uses 2 max 100 watt bulbs.

I think all of these beauties meet the requirements above. So the decision really boils down to aesthetics; which one makes a statement and complements my foyer? Let me hear your suggestions in the comments.

update

and the winner is…

decor_by_demi_minka_lavery_flush_mount_entryway_light.jpg

Here she is in all her glory! I decide to go with the Minka Lavery semi flush mount because it really is a classic light fixture! I think this one has less of a chance of feeling dated in the years to come. I also think it complements my gold mirror beautifully as well as the aesthetic of my Georgia Colonial home!

Stay Stylish, (2).png

Traditional vs. Transitional Style: What's the Difference?

decor-by-demi-traditional-design-versus-transitional-design-and-their-differences.jpg

Ever wonder what's the difference between traditional decor and transitional decor? These two styles have similar core design elements, but when compared side by side, the finished look is completely different. 

As noted before in a previous post (read here), there are a number of different design styles to choose from and there is certainly overlap between them. However; I've noticed that people have a hard time identifying the difference between transitional and traditional styles. So I've decided to provide a little cheat sheet to help you figure out which is which to better define your style.


Traditional Style

Traditional design gained influence in the 18th and 19th century in Europe. It's style is very ornate and interiors are generally filled with heavy furniture and warm colors. The characteristics of a traditional room may include: furniture with tufting and curved feet, ornate woodwork, heavy drapery, and varied patterns. Let's take a look below at some sample interiors...

decor-by-demi-traditional-design-example.jpg

First off, let's all stop and admire this gorgeous paneling! The wood tones are warm and inviting. Notice the fine details in the crown molding; those little "cubes" are called dentil. The woodwork dominates the room and sets the stage for the rest of the decor. As mentioned above, the furnishings feature curved lines with tufting. Also check out the ornate details on that chandelier!

And this one…

This room feels heavy thanks to the silk drapery panels.  The red, gold, and tan hues, dark wood floors, as well as the varied patterns contribute to the warmth in the space. Again, we see the curved furnishings, fancy caster feet and ornate details within the wood coffee table and side table.


Transitional Style

Transitional design is a mixture of traditional and contemporary design. It's aesthetic is characterized by modern lines mixed with curved furnishings and neutral wall tones in hues of beige, ivory, and grays. This serves as the perfect backdrop for contrasting pops of color found in accessories like artwork and pillows.

The contemporary elements in a transitional room showcase furnishings that are smaller in scale with less ornamentation than the traditional style. This design style celebrates simple architecture.

Let's look at a couple of transitional interiors in more details...

Both of these rooms look less luxurious and feel more relaxed than traditional interiors. Notice how both also showcase a simple aesthetic void of ornate details, dark wood tones, and millwork. Each space feels light and airy; thanks to a neutral color background with pops of color seen in the decor accessories. Lastly, the furnishings mix modern lines with classic curves to create a comfortable environment that transitional pieces are known for.


Transitional vs. Traditional

Now that we've highlighted the historical elements of the 2 design styles, let's do a side by side comparison to discuss the differences between them.


The Difference: Wood Features

Transitional

Traditional

Both of these rooms showcase beautiful wood paneling. However; in the traditional space the woodwork is the prominent feature in the room. Whereas in the transitional space, the wood paneling has been painted and is subdued. It blends seamlessly into the furnishings.

Additionally, the colors in the traditional room are more saturated and intense, while the transitional space is mostly neutral with pops of soft pink. Furthermore, notice how the transitional space looks and feels light and airy compared to the warm and heavy feel of the traditional room.


The Difference: Texture

Traditional

Transitional

This transitional room mixes different textures to create depth in the space. The textures shown include: jute, leather, wood tones and geometric patterns to create an interesting and calming space. Whereas traditional spaces will generally mix varied patterns and colors to create a more layered and luxurious feel. However; both rooms provide visual interest and comfort.


The Difference: Patterns

Transitional

Traditional

Both rooms have a neutral background. However, in keeping with the design style, the traditional room uses a bold, saturated navy as the accent color. Although only one accent is used, the typical feature of various patterns are seen throughout in the throw pillows, chairs and draperies.

Transitional interiors are not void of color however; the pops of color used can be subtle and are repeated throughout the space. Neutral is the theme of this space except for the navy and soft pink accent colors used only in the pillows and artwork.

Another interesting thing to note is the level of symmetry in each space. Traditional design is known for symmetry and the room above is no exception which showcases its use in the chinoiserie vases, floor lamps, and chairs. A transitional room can be symmetrical but this design style is not typically known for it.


The Difference: Lighting

Transitional

decor-by-demi-transitional-light-fixture.jpg

Traditional

decor-by-demi-traditional-design-light-fixture.jpg

In keeping with the same picture above, transitional spaces lean towards the contemporary side with modern lights fixtures. On the other hand, traditional interiors are usually fond of vintage or ornate inspired lighting.


The Difference: Art

Transitional

Traditional

The groupings of the different frames along with the black and white images display a modern and contemporary theme in this transitional room. In contrast, gilded frames and oil paintings are more commonly found in traditional spaces, as seen in the picture above.

I hope this post gives you a better understanding of the differences between traditional versus transitional styles. Now that you know some of the key differences, tell me what's your favorite style?

Stay Stylish, (2).png

10 Questions to Ask When Hiring an Interior Designer

decor-by-demi-questions-to-ask-before-hiring-an-interior-designer.jpg

Hiring an Interior Designer is equivalent to buying jeans; one size doesn't fit all so you try on pair after pair until you find the perfect one. Likewise, all designers are not created equal so its important to know what your goals are and to write down those questions that matter the most before you make a selection.

Sometimes its hard as a client to know exactly what your needs are when you're not good at decorating. Otherwise...you wouldn't need help in the first place! So I've tried to narrow it down to 10 questions you should ask when hiring an interior designer to set you on the right path!

Hiring an Interior Designer Question #1: What's Your Design Style?

Or better yet what's the designer's style? Although most designers can deliver your aesthetic wishes when asked, its important to find one who isn't "a jack of all trades". Think about it; would you want to go to a doctor that claimed to treat any and every ailment? No!

Find a designer that specializes in a certain niche or design style that is your favorite. Take a look at their portfolio and see examples of their work. However; before you do this, its best to understand and know what your style is. That way you're able to communicate the look and expectations to a designer that is familiar with this aesthetic.

Hiring an Interior Designer Question #2: What's Your Budget?

Let's face it: no one likes to talk about money. However; the sooner you get over the uncomfortable feeling that the topic brings, the sooner you can get down to business with establishing priorities within your budget. It's important to set realistic expectations with what you are willing to pay and the quality of the pieces that are a result of that budget.

It's also a good idea to establish a budget beforehand because there are some designers who will only work with clients that meet a minimum design budget. Knowing your budget ahead of time will help steer the conversation in the right direction with a designer who is comfortable working within your means.

Hiring an Interior Designer Question #3: What's the Designer's Fee?

Every designer's business model is different. This includes the designer's fee. Similar to the budget question, there are some designers that may require a minimum design fee to work with you. Some may charge a fee per room, or it could just be a minimum dollar amount based on the scope of work. You need to ensure that you take this into account when establishing your budget.

Because I love alliteration and fashion, let's go with an example. Banana Republic and Bergdorf Goodman are both clothing stores. You could go into Banana Republic and find a cute dress for $50. Or you could go to Bergdorf's and find a fabulous one for $2,500. The latter dress doesn't automatically equate to great customer service and quality materials. Likewise, the Banana Republic dress doesn't automatically mean subpar service and materials.

What does this mean for you? That you also need to be mindful of what you are receiving for this fee; regardless of whether it's a $99 design fee versus $9,999. Is the designer reputable? How often do they provide updates on the progress of the project? Do they offer after-install support? Do your homework like you would with any other purchase. Find a fee that you are comfortable paying and provides a level of quality service you deserve.

Hiring an Interior Designer Question #4: Does the Designer Have Testimonials?

Testimonials speak to experience. A portfolio will give you a glimpse into a designer's style and taste however; its important to look for those tried and true testimonials. They will provide the answers to what it's like to work with a designer and whether they really mean what they advertise on their website.

Hiring an Interior Designer Question #5: Does the Designer Source Retail or Trade Only?

This question may not have been on your radar but it's important nonetheless. Designers usually source trade only items. Trade furniture is expensive however; this is what allows you to have those one of a kind, unique pieces that speak to your personality and make your home stand out.

However; if your budget and goals dictate otherwise you will need to find a designer that will purchase retail items. Sourcing retail items generally dictate lower profit margins for a designer so be sure to discuss this upfront.

Hiring an Interior Designer Question #6: Are You Ready to Buy Everything Now?

If your plan is to buy everything through trade only vendors, the expectation of the designer is that you plan to purchase all items now. However; if you wish to purchase items as your budget and time allows, you will need to make sure your designer is on board with this. Why? Because the latter route will usually mean smaller profit margins for the designer and the possibility of items being out of stock when you are ready to buy.

Hiring an Interior Designer Question #7: What's the Timeline?

Are you in a rush to get a project completed because of a big event coming up? If so, then trade only and custom pieces are out of the question. Ready made items from retail stores would be your best option.

Or are you just moving into a new home and want to start with the basics now and complete finishing touches later? Trade only sources would be a great option however; be mindful that your pieces will take a while. Lead times vary greatly, ranging from 6 weeks and beyond. Knowing your timeline is something to discuss with your designer so that you can realistically know what to expect with lead times.

Hiring an Interior Designer Question #8: What's the Designer's Communication Process?

What is the designer's communication methods? Do they allow you to text? Or is it email or phone calls only? Do they respond on weekends? Find a designer who has a flexible communication process that you are comfortable with so that you never feel as if you're being ignored.

Its also important to work with a designer that offers a communication style that suits your personality. Do you desire to know the project status on a weekly basis? Or are you a little more laid back and only want to get updates when necessary? All of this needs to be discussed before hiring a designer.

Hiring an Interior Designer Question #9: Does the Designer Offer Full-Services Only?

Actually you should first determine whether you think need someone to provide support through the entire process. If the answer is yes then you will need full service. With full service, a designer will normally provide all of the following:

  • In-home consultations

  • floor plans

  • Handling all of the purchases and delivery

  • Storing all furniture until installation day

  • Overseeing of final installation

  • Styling of rooms with finishing touches (i.e., accessories)

However; if your your goal is to only have someone provide guidance or direction in getting you started on your design project, you will want to find a designer that offers something other than full service. These other services are generally a less expensive option while still providing the opportunity of working one-on-one with a designer.

I offer E-Design services to individuals who would like the help of a designer but aren't interested in full service. Click the link above to find out more and see if they are the right fit for you.

Hiring an Interior Designer Question #10: Does the Designer Offer Post-Install Support?

If you desire to work with a designer who provides e-design or design only consultations, will you need help after the final design has been delivered? Or are you fine implementing the design on your own?

If help is needed, then you will want to work with a designer that provides post install support. This means they provide a set amount of time after the design has been delivered to assist with any questions you may have.

So now you see there are a number of questions to ask before hiring an interior designer. Working through the answers will provide you with the clarity you need to find the perfect designer for you.

If you think I might be the one, be sure to contact me to get started!